Screen calibration
The essential first step in implementing color managed digital image production pipeline is ensuring the fidelity of all screens, that colors displayed are as close as possible to what images contain. This is the calibration process.
Calibration, by greatly improving the fidelity of the screens, makes it possible to have a correct, or even very good, display, by using a probe, even with screens of lower quality1.
Introduction
The purpose of screen calibration is multiple:
- ensure that for any given color value, all screens in the production pipeline display the same color,
- ensure that for any given color value, the color displayed is the one recommended by the color space used by the screen,
- ensure that the people using the screens perceive the correct color (taking into account the influence of the environment).
The obstacles to achieving this are also multiple:
- Screens in their factory configuration are rarely true to the advertised color space.
- Screens age, and their colors can therefore vary over time. Not to mention that even the temperature can influence the electronic components, and therefore the displayed colors.
- It’s complicated to have an objective reference where we’re sure that the colors are correct, which can be used as a point of comparison.
- The environment (ambient light, color of the walls…) influences the perception of the colors.
The most reliable way to achieve this is to rely on a calibration probe.
A probe is actually a light sensor that works in tandem with the computer to apply color corrections, and its role is to measure the colors displayed by the screen, to compare with reference values. Most probes are also capable of measuring the ambient light to take into account variations due to the environment and human perception.
The use of a probe therefore makes it possible to overcome all these obstacles:
- They make it possible to measure the colors of the screen and their shift in relation to the reference values of the color space of the screen,
- by recalibrating the screens regularly, they make it possible to maintain sufficient fidelity throughout the life of the screen and the conditions,
- they avoid the need for a reference: they can objectively measure colors, the values of which can be compared directly to the values expected by the color space of the screen.
Most of the probes can remain connected to the computer, and regularly measure the ambient light, in order to compensate for the variations in realtime.
However, in the absence of a probe, it’s also possible to improve the display of colors with another sensor: the eye. The results will not be as accurate as with a probe, but the display of the worst screens can nevertheless be improved. The main problem with eyeballing is the lack of an objective reference to compare colors: it’s impossible to be certain that the displayed colors are the correct ones. The influence of the environment is also a problem, but one that can be compensated for with a good organization.
Environment
First of all, a relatively easy parameter to control is the working environment and the ambient light in which the colors of the screen are seen.
A few simple rules ensure that colors will always be perceived the same way, as objectively as possible.
- Avoid natural lights as much as possible, which vary at every moment; if working on colors is essential, a room without windows is ideal. Without going that far, the possibility of dimming light from the windows as much as possible, or shutters to cut it off completely if necessary are simple but effective solutions.
- Control the lighting and the color of the walls (which make up the general color of the ambient light). Color spaces generally define the conditions under which their colors are supposed to be seen; the ideal situation is therefore to respect the recommendations for the space used by the screen. In all cases, neutral light (white, of a defined temperature*, but not colored) and of good quality should be preferred; walls should be as neutral as possible, and ideally gray rather than white.
- Control the brightness of the screens, according to the ambient light: screens should be sufficiently bright in relation to the environment (but not so much as to appear excessively bright: it shouldn’t be a visible light source).
Here are the parameters of the environment as recommended by the sRGB color space, that of the majority of screens, and applicable to other spaces (P3, Rec.2020, etc.):
- Ambient light : 64 lux to 200 lux*.
This is low to very low light, lower than typical office light (which is between 300 and 500 lux). - Lighting temperature : 5003 K, D50.
It is a relatively orange light, close to that of the sun. It’s voluntarily a little far from the white of the sRGB and therefore of the screens (which is 6500 K, D65). - Wall color : Medium gray (20% reflectance).
The walls should absorb 80% of the light rays they receive, making them medium gray. - Screen brightness : 80 cd/m²
sRGB (just like P3 for display) recommends relatively low screen brightness (if the environment is dimly lit as recommended). A slightly higher brightness may be necessary if the environment isn’t dark enough. It should be noted that spaces dedicated to video such as Rec.709 or Rec.2020 are adapted to TV screens with a screen brightness of 100 cd/m², and that it may therefore be useful to increase the brightness of the screens towards this value if producing for broadcast television (or cinema).
Calibration
Once the environment is controlled, or in any case adjusted to working conditions, we can proceed to calibrate the screens.
Before starting, you must ensure the parameters of the calibration to be carried out.
Choice of the screen color space and calibration
Choose default one, in general sRGB or sometimes Display P3 or more rarely others.
You can also decide to calibrate to a space different than the one intended for the screen, as long as the two spaces are compatible. This can be useful when all produced images are intended for a specific use (TV, cinema, etc.) in order to work in a identical space to or close to that used for the broadcasting of the finished images. For example, screens can be calibrated in Rec.709 to produce HD videos for television and watch them in broadcast conditions, without having to convert the videos to the screen space at time of playback2.
To do this, the primaries* of the two spaces must be the same, or the gamut* of the screen space must be larger and contain the gamut of the space in which we are calibrating. In any case, one shouldn’t forget to change the display settings in all applications and the operating system so that the images are correctly displayed in the space in which you have calibrated the screen. It’s for example possible to calibrate a P3 screen in sRGB but not vice versa (P3 is larger than sRGB), or to calibrate an sRGB screen in Rec.709 or a Rec.709 TV in sRGB (the primaries of these two spaces are the same). This also means that a screen using a wider gamut is able to display an image using a smaller color space, e.g. a P3 screen can display an sRGB image, but not the opposite.
The choice of space will define the primaries* and transfer curve* used; the white point* (and its brightness) can often be adjusted separately.
White point and brightness
The white point is often adjustable when using a probe; unless there are specific needs such as printing work (in which case the white point can be that of the paper), we choose that of the color space of the screen, i.e. D65, 6500 K in the majority of cases.
The brightness can also often be measured and adjusted. When working for sRGB images intended to be viewed on a computer screen, the reference is 80 cd/m². If you’re working with video for television (or cinema), the brightness can be that of Rec.709, i.e. 100 cd/m². It may be useful to choose a slightly higher value if the working environment is too bright. If working in HDR, the maximul brightness can be much higher.
Calibration and application of the color profile
Calibration
When using a probe, the process is usually quite simple: plug the probe to the computer and place it flat on the screen (or facing the projector screen)3. A software provided with the probe (or the very powerful free software DisplayCal4) then carries out a series of measurements of the colors displayed by the screen. The result of these measurements makes it possible to calculate the shift between the displayed colors and the expected colors.
Hint
It goes without saying that it’s essential to first deactivate any nighttime display option on the screen or the system, as it greatly alters the colors.
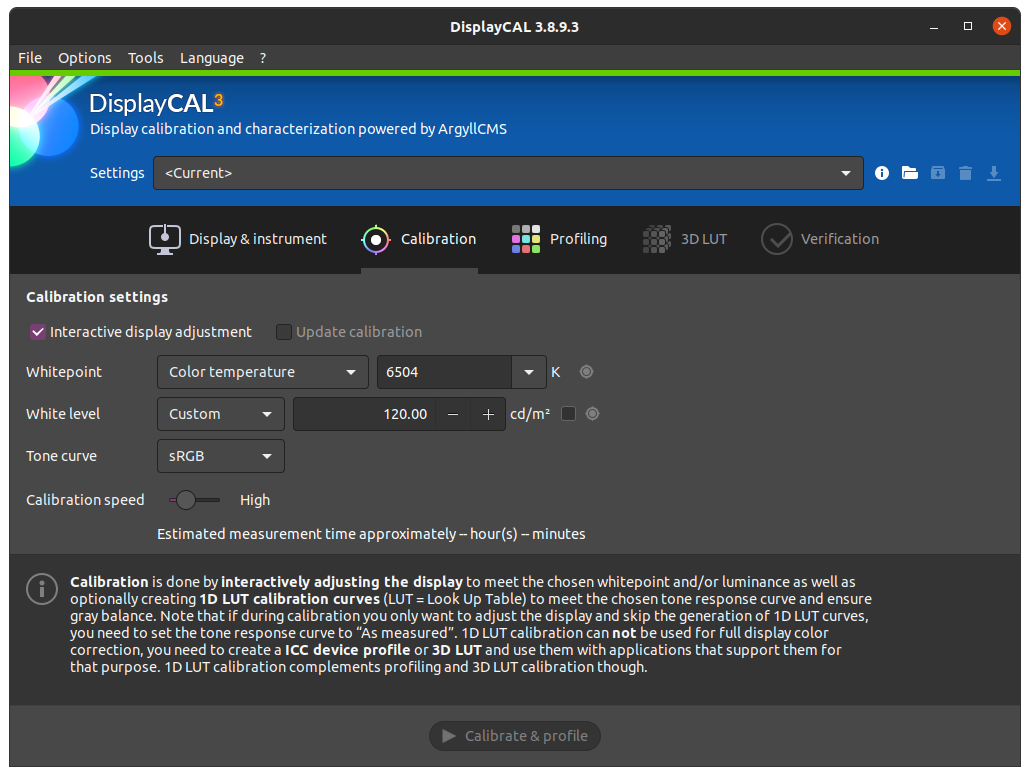 Calibration settings in DisplayCAL
When calibrating by eye, the principle is to display a series of test patterns, reference images, and to try to adjust the screen settings manually to get closer to the description of a reference image. It’s completely impossible to correctly adjust the primaries* and white point* by eye, but one can try to get close by displaying different images. On the other hand, the brightness*, the contrast*, the gamma* can be relatively well approximated thanks to comparisons of gray values between them (and a lot of patience).
To calibrate by eye several methods are possible, but everything always starts with the display of test patterns and reference images. Some operating systems offer them, you can also find them on the internet like those we propose here, carefully crafted to accompany this document.
These test patterns can also be used to check the result of the calibration with a probe, and the capabilities of the screen after calibration.


It is best to display these patterns in full screen and with a controlled environment, as explained previously in the Environment section.
Then, by displaying the images, the screen settings can be adjusted. There are three possibilities:
- tinker with the hardware screen settings; but they’re often quite limited and imprecise,
- adjust the settings of the graphics card via its driver, if it allows it.
The advantage is that the correction will be correctly applied in all situations; but it’s possible that the parameters will be re-initialized when the system or the drivers are updated, - if the operating system offers it, make the adjustments via its color utility and save then apply a color profile to the screen.
It’s then necessary to make sure when applying updates that the system doesn’t re-select another profile. The advantage of this method is to be able to keep the settings in a file that can be saved and moved, the profile, generally in.iccformat.
Warning
At the time of writing this document, during our tests on Mac OS, the screen calibration tool in the system settings has a mediocre method (and results) (except perhaps with Mac screens) and doesn’t offer test patterns worthy of the name, it should be avoided. It’s better to calibrate directly with good patterns such as those we offer, using the screen settings or other utilities.
Tip
Windows offers a good visual screen calibration tool with rather good results. It can be found via the control panel, in Color Management then the advanced tab. Click on Screen Calibration and let yourself be guided! It’s in these Color Management options that you can apply and choose the spaces and profiles (calibration result) of the screens.
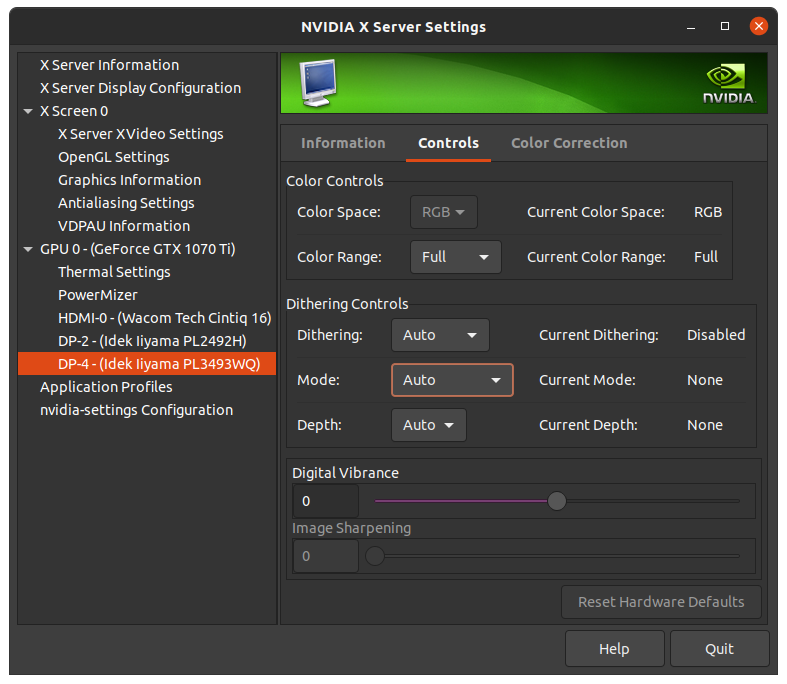
Example of parameters via the settings of a Nvidia graphics card (under Linux). Note especially here the color range parameter, to be set to Full if the screen is a computer screen, and Limited if it is a television.
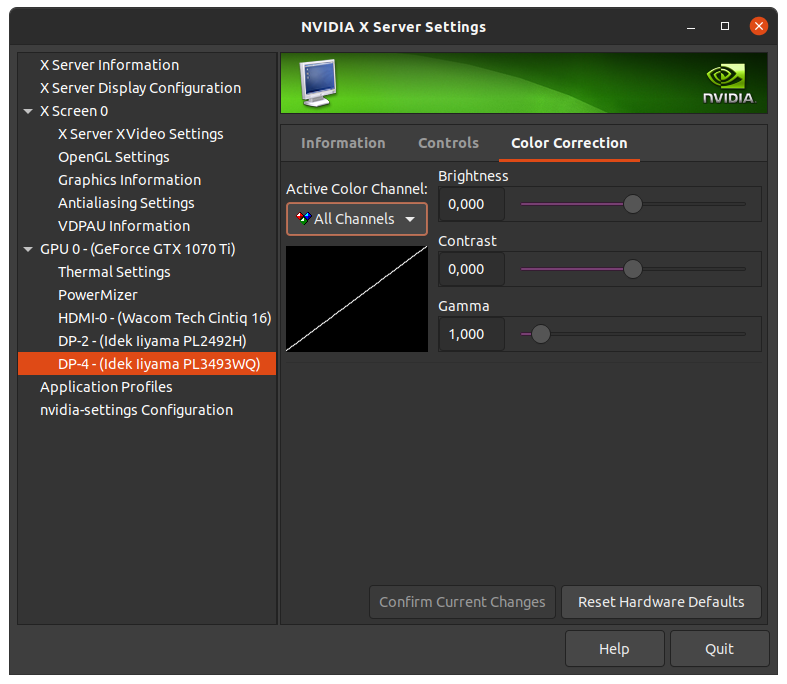
Example of parameters via the settings of a Nvidia graphics card (under Linux). Here, different sliders allow to adjust the color display (for each screen). Each slider can act on the three channels* at the same time, or separately on the red, green or blue channels.

Mac OS only natively offers just a very limited tool for calibrating screens, where you can only adjust the contrasts via the screen settings, and choose a white point (without measurement or even visual control).

Windows offers a efficient calibration assistant: look for “calibrate screen colors” in the system settings and let that guide you.
An application dedicated to calibrating HDR screens is also available on the Microsoft Store, search for “Windows HDR Calibration”.
It is not recommended to combine these different methods, as the result quickly becomes quite random, and above all difficult to retouch or correct later.
Color profile
The result of the probe calibration, or sometimes a calibration by eye, is saved in a color profile, a LUT*, generally in the .icc or .icm format. It’s the operating system which will apply this profile or this LUT to all the colors when displayed on the corresponding screen and thus convert these colors so that they’re displayed exactly as they should.
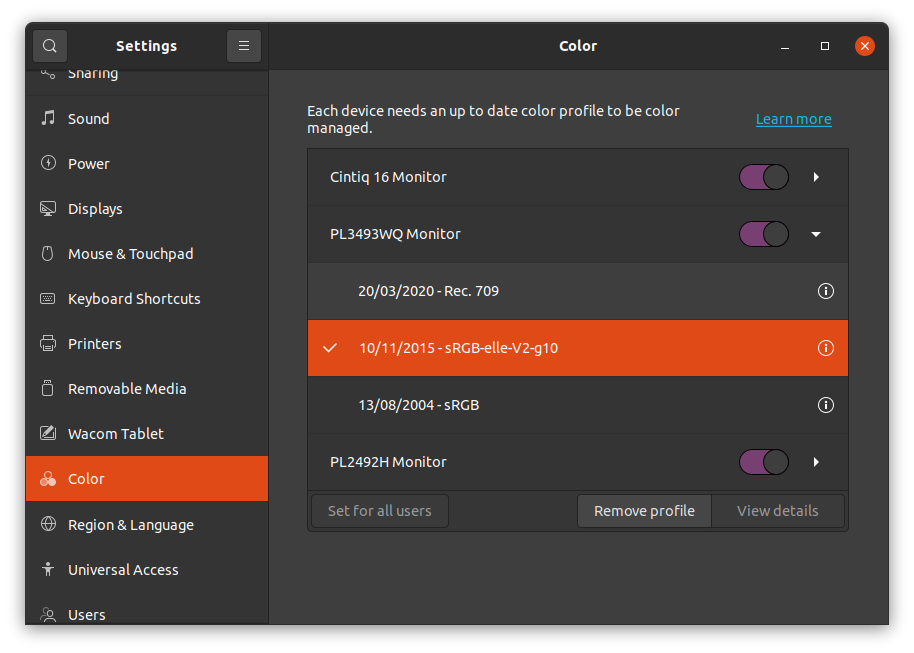
Choice of color profiles under Ubuntu Linux in the Color section of the settings. A button allows you to add profiles (predefined or imported via a file, for example generated by a probe) to the list under each screen to easily switch profiles later.

Windows allows to select from a list of installed profiles, that is to say copied to the correct folder, or installed by a calibration software.

Apparently, on Mac OS it is not possible to load your own colorimetric profile, the option is therefore useless for screen calibration.
Once the calibration is completed and the profile applied, you can check the result by displaying various test patterns (see above, Calibration by eye), and also check the quality of the screen after calibration. Note that if you calibrate with a probe but the display of the test patterns isn’t perfect, this is probably more linked to the quality of the screen than to a calibration defect.
-
As long as the colors of the screen are approximately uniform and identical in the center as well as on the edges and in the corners… ↩
-
It should be noted that it’s not at all necessary for the screens to use the broadcast color space: thanks to color management, displayed images are converted for the screen space so that the displayed colors are exactly those of the broadcast no matter what; calibrating screens in the broadcast space just allows you to avoid this conversion, and to avoid common configuration errors by systematically choosing the broadcast space, whether for display, file output, etc.
A concrete example: when working in video and television, the images will be in Rec.709, but the working screens are by default in sRGB. When producing images, it is therefore necessary to specify that the images are displayed in sRGB (but this is often automatic), whereas when exporting Rec.709 must be chosen. If screens are calibrated in Rec.709, Rec.709 can be chosen everywhere without any mistake (but it’s less standard in computing, and the default or automatic configurations may be wrong…). ↩ -
It is advisable to start by restoring the screen settings to as neutral as possible, disabling power saving, the various modes (game, office, video…), to let the sensor and the system control the colors. ↩
-
DisplayCAL is free and available on Linux, MacOS, Windows and supports a wide range of probe makers and models: https://displaycal.net/ (original), github.com/eoyilmaz/displaycal-py3 (new linux version). As always, we strongly encourage you to make a donation if you decide to use it! ↩